With the cold weather slamming into Wisconsin, per usual, my workshop days are once again limited Some day I will have a heated work shop, but until then, my garage days are few and far… More

D.I.Y. Adventures of Kelly Whitman.
With the cold weather slamming into Wisconsin, per usual, my workshop days are once again limited Some day I will have a heated work shop, but until then, my garage days are few and far… More

I know many of you have a new way of doing school this year. For us, we were grateful that this was our 5th year in doing online school at home. I devote a large… More

It’s been quite a while since I paired creativity with the use of my green thumb. Several years ago, I created a Primitive Tipsy Pot Planter and I felt like it was time to… More

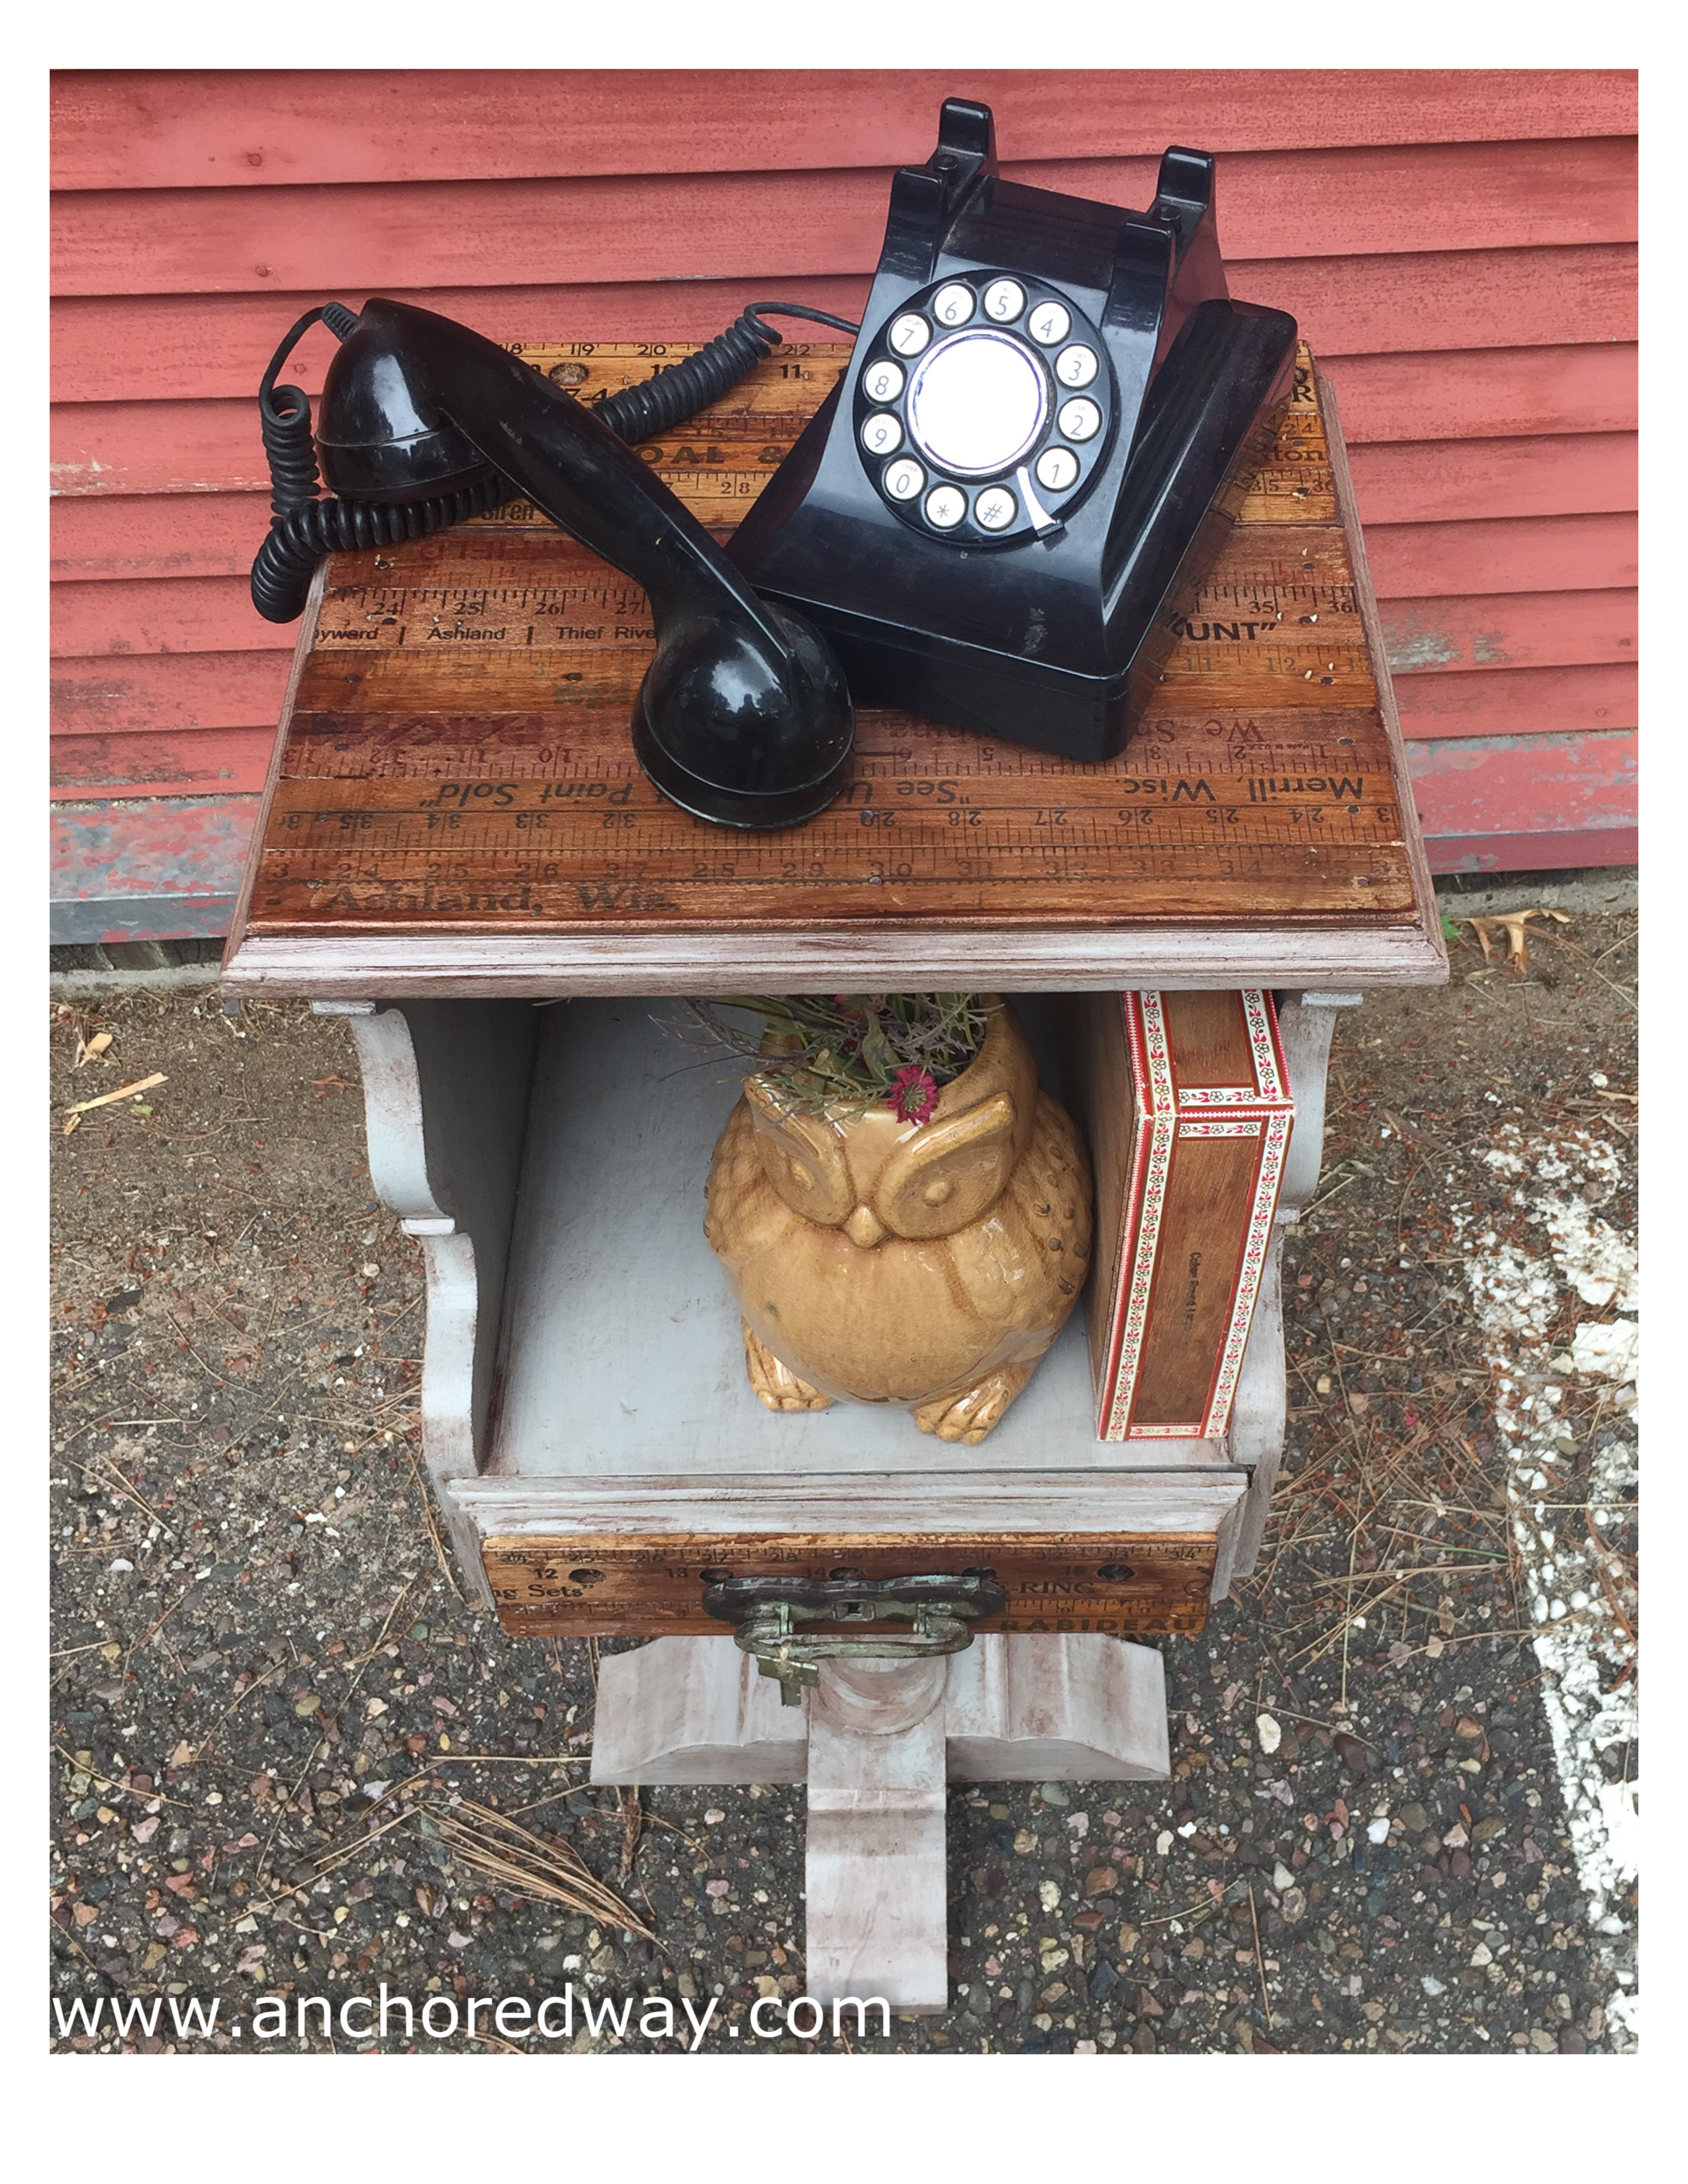
An old handmade wood phone table; something that might not catch everyone’s eye. However, it definitely caught mine. I saw potential in this old table, and knew it would be a great DIY project for my 11 year old daughter to help me with!
This summer I have made it a priority to involve either one or both of my children in any DIY project that I work on. To be able to include them in what I am passionate about, and to teach them the basic use of different hand and power tools, has helped me to fall in love all over again with transforming basic pieces of furniture into unique pieces of art.
For my latest project, my daughter got to pretty much run the show. I let her choose the paint color and many design aspects of the entire piece. She picked out the new drawer pull, drawer liner, and the sign for the side of the table, and she even picked out the cute vintage phone to help stage our new phone table.
Below is a series of photos that we took during our project.


The first step to any good restoration project, is sanding. After sanding, Cam got to work on painting the table. She mixed Beyond Paint’s ‘Soft Grey’ & ‘Pebble’ and called it Cobblestone. Once the table had a few coats of grey, we then worked together to stain and poly the entire piece to give it and aged look as well as give it a nice protective coat of poly. For this, we used Rust-oleum’s Stain + Polyurethane in Dark Walnut. I almost forgot to mention, that I also ‘knocked off’ the top trim detail on the cabinet to give it a more modern and clean look, and because one edge was already broken off when I got it.
The next step is always the hardest: waiting for it to dry! During this time, I taught Cam the fun of using Mod-Podge to apply a piece of postcard scrapbook paper as a liner in the drawer. I think she liked doing this so much that she might just mod-podge our entire apartment!
Cam enjoyed picking out different yardsticks to use for the front of the drawer and the top of the cabinet. Once she had the yardsticks picked out, I got to work measuring and cutting them with a miter saw. I had to do a little mix and match on the top with some different sizes, but in the end it all worked out and they fit perfectly! Cam was in charge of laying down the wood glue, and placing the yard sticks in their places, then we hammered them into place. I used my nail gun at first, but unfortunately, once I got to the thinner yardsticks, the power of the nail gun was a bit too much, so I went back to the good ol’ fashioned hammer and nail, and actually like this look better when working on vintage piece.
Once all of the yardsticks were attached, we sanded down the edges to give them a more uniform look. Then it was time to add some stain and poly! A bit of brushing it on and dabbing it on gave it a nice worn wood look.
The next step was for me to attach the new handle. Since there had never been a handle or a pull on this drawer, I had to measure for the two new holes to be drilled. I’m no perfectionist when it comes to making things even or straight, but somehow, I got it on there perfectly in the right spot!
Finally, we attached the phone sign to the side, tied an old key to the front drawer pull and it was complete.
We took our new phone table on a little joy ride around the city of Eau Claire until we found a quiet spot for a photo shoot. I wanted to name the table, but Cam said we couldn’t or she would get too attached to it! So, here it is, our nameless, wonderfully restored and reinvented phone table:
Before:


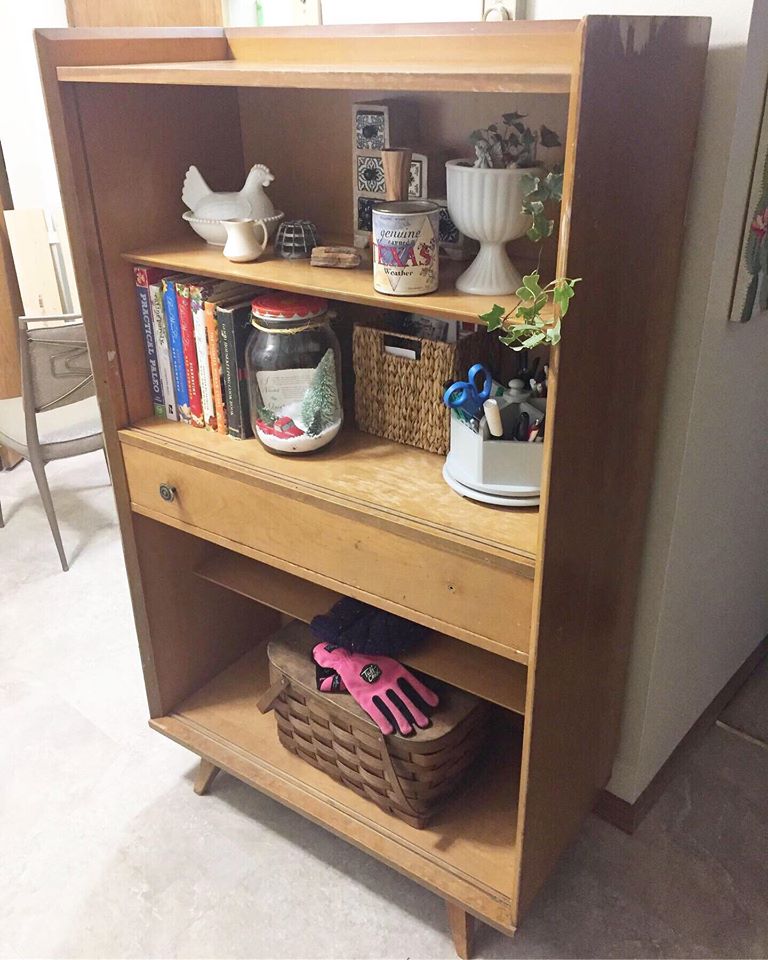
I am someone who loves a good transformation story, whether it be about someone’s own life or simply the transformation of a forgotten piece of furniture. This curbside hutch is definitely a transformation that makes the DIY’er in me skip for joy.
A few months ago, I transitioned from living in a farmhouse out in the country to a small townhouse in the city. This process wasn’t an easy one, but it forced me to minimize drastically and to step back and look at what really matters in life. In order to make my move easier, I left a lot behind and also donated a lot to our amazing local thrift store, Hope Gospel Mission Bargain Center. Once settled into the new townhouse, I knew that there would be furniture pieces I would need to find in order to make things here work and have some kind of organization. I believe everything should have a place, or it doesn’t belong. Yes, I’m one of those people who thrives off of organization and order in a home.
Feeling a bit disorganized in my kitchen, with minimal storage, I knew I needed something to act as a storage space for my special dishes, as well as a space to act as my ‘office junk drawer’ which would hold loose papers, mail, pens, scissors, etc. I knew I couldn’t spend any extra money on furniture that month, so I was just waiting, hoping something would come along at the right price: free.
Then…shortly after I moved in, I saw an online post for a free hutch. Not just any hutch, but a mid-century modern hutch that was begging for some tender loving care. I, without hesitation, contacted the seller, hopped in my van, and headed over to get it immediately. The hutch was halfway across the leaf filled lawn. I opened the back of the van, walked up the the hutch, went to pick it up… and realized it was heavier than I had anticipated, so I stepped back, looked at it, and had the typical DIY’er thought “Is it worth, hurting my arms, legs and back, to get this home?” The answer, was of course, “Yes!” So, pondering for a minute, I tried to think of how I could get this across the lawn solo. I tilted it on it’s side and pulled it across the lawn, carrying about 50% of the leaves in the lawn with it. If anyone was watching out their windows, I’m certain that they were slightly entertained. A few leg bruises later, I had lifted it up into my van, and got it home safe and sound.
Here it is before I started working on it, once I set it in my kitchen, without the glass and the bottom two doors:
 I gave it a good wash, and got to work. Using Beyond Paint’s color ‘Pebble’ I gave it two coats of paint and let it rest. I truly think waiting for paint to dry is one of the hardest thing for a go-getter who just wants to get a project done! (*ahem* me!) After waiting impatiently, the hutch was dry, complete and ready to be staged! The best part!
I gathered items I had in my booth at The Shed, and a few other items I had just moved out of boxes. As I’m writing this, it has already been re-staged and has a few different things inside and on top! I will post an updated photo soon, for anyone who is interested in how I style my hutch, just give me a shout in the comment area below.
Here she is in all of her mid-century modern glory:
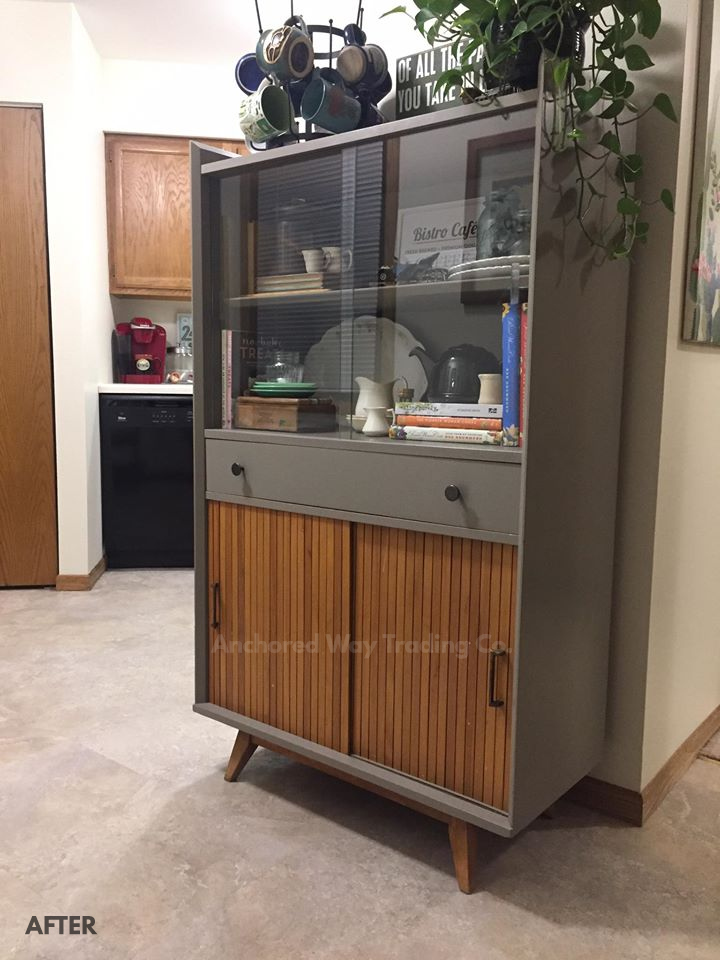
Here is a side by side of the before and after so you can really see the transformation:

A few photos of the inside:


Having a small kitchen, a piece like this, although it takes up room, it is an essential piece for staying organized, and can serve as many different things, as I can change out what I store inside, anytime I’d like.
Remember to always try to have eyes that see potential, where others see nothing. There is so much beauty to be found, if we look at what something can be, instead of what it is.
Make sure to follow along over on Facebook and Instagram to see more of my projects, adventures and as always, inspiration.


I have had an old wood coffee table sitting in my workshop for over 2 years. I unfortunately don’t have a before photo of it, but you can use your wonderful imagination. I got it with the intention of giving it just a simple paint makeover. I pulled this piece back out the other day, grabbed a stack of random stir sticks and yard sticks and got to work. The first thing I did was cut down all of the yard sticks and paint stir sticks to size, attached them with both wood glue and my handy new Dewalt 18 gauge brad-nailer. This tool has been such a big help with all of my projects. I am excited to use it more this spring and summer to tackle more wood working projects and to actually BUILD more!
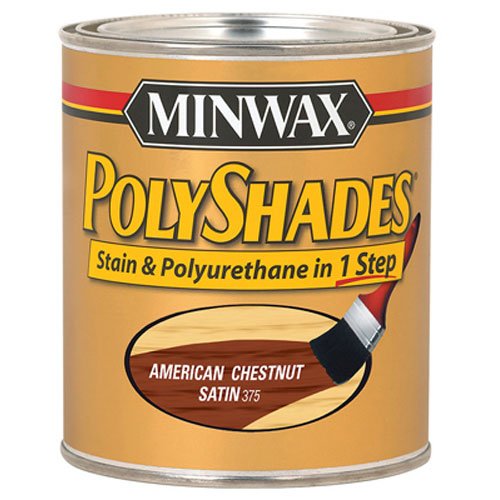
After cutting each yard stick/ paint stick, I glued them all down in no particular order. I did this one piece at a time, before planning out where they went, so it is completely random as you can see. No rhyme or reason worked for this one. Then once each piece was glued down, I put in a few short nails with my brad nailer into each piece. Next, I taped off the edges of the stir and yard sticks, and painted the rest of the table in ‘Old Soul’ grey paint, which I got as a sample from the Eau Claire Fleet Farm. Once the two coats of paint dried, I took off the painters tape and gave the entire table, including the yard/stir sticks a nice coat of Minwax Stain + Polyurethane, Polyshades Satin in the color ‘American Chestnut.’ This is one of my very favorite stains to use! After staining, the table was finished!
Take a look below at the final result!


This coffee table will be for sale soon in my booth at The Shed in Altoona, WI (1519 Mayer Rd). Or you can message me if interested in purchasing first! 

When I saw this table sitting full of dust and dirt hidden behind other furniture in a thrift store, I knew it had to come home with me. I thought that this table would be perfect for adding some height and a little bit of storage space into my booth at The Shed in Altoona, so into my trunk it went, dust, dirt and all.

I gave the table a good wash and got right to painting with my favorite color from Beyond Paint, called ‘Nantucket’. I have painted many pieces this color and just love the way they turn out every time. This color reminds me of the old hutch my parents have that was my dads Grandfathers, and it is painted in a color name my dad made up after my Grandpa who painted everything this blue, ‘Richard John Blue.’ This color from Beyond Paint is almost identical and it helps me to feel a little bit connected to the past in a small way. I’m always looking for ways to connect myself to those who were before me, and especially those who were handy-men and women in my family in the past. This color does that for me.
Here is the side table after a few coats of Nantucket.
After:


I love this transformation and really enjoy the whole before and after process that comes along with projects like this one, and seriously look at those baby cowboy boots? I just had to add those! I picked up the boots at a thrift store with the intent to sell in my booth, but just can’t let go of them yet! Soon, they along with this table, and the pitchers shown above will make their way into my booth at The Shed 1519 Mayer Road in Altoona, WI! (OR if you are interested in purchasing anything shown -other than my Grandma’s books;) just let me know before I haul them into my booth!)
I hope you enjoyed this quick & easy transformation and that it inspires you to take on your own painting projects!
Paint used : Beyond Paint. ‘Nantucket’

A few years ago I had a friend come to me and ask me to makeover her daughters’ play kitchen set. I of course, said yes. I love working on pieces from the past. To be given the chance and the opportunity to bring something back to life that may otherwise be forgotten gives me the greatest joy. This set wasn’t in horrible condition either, which made the transformation that much easier. There was no major repair work that needed to happen in order for me to begin the transformation process.

To complete this project I did the following:


This was such a fun project to work on and I hope that it is enjoyed for many years to come by many different children!

There once was a sad little table that no one wanted. It was tossed into a dark corner in a garage, waiting and hoping to be rescued. All it wanted was someone who could see it’s potential and possibility that it had underneath all of the  scrapes, scuffs and scars.
Full of spider webs, dust and debris, it waited and waited and waited.
One day, the garage door opened. It saw the sunlight for the first time in what seemed liked forever and it thought, ‘What is this!?’
It felt someone pick it up and suddenly the next thing it knew, it saw the garage door disappearing in the distance. ‘Going to the dump I suppose.” The sad little table thought.
Little did it know, it was on it’s way to be rescued. The table was frightened when it noticed that it was placed in what seemed like another dark corner of a building. ‘Here we go again!’ It thought.
The garage door didn’t shut, and the table was set on top of drop cloth. It heard a loud noise suddenly and it felt all of the years of use, abuse, wear and tear slowly fading. All of it’s scars were sanded away. Deep down it could once again sense a little bit of hope and it knew that this time, something was different.
As a new layer of paint was applied, it felt incredible. If tables could smile, this table would have been wearing the biggest smile you’ve ever seen.


You see, once the tables scars were cleaned out, and sealed off, it was able to live again. It was rescued, redeemed and renewed, much like how God uses hard times in our lives, to cleanse us , wash away our scars and make us new in Him. He never loses His vision for us, we can never be too far gone, that our loving Father loses sight of our potential in all that He created us to be.
This is why I do what I do, this is why I rescue things that have been forgotten. Everything deserves a second chance and a new lease on life.
If you have a piece of furniture that you are thinking of tossing, take a second look. Maybe it just needs someone to care enough to look at it with a new set of eyes.
——–
Come see me on Facebook and make sure to like, click Follow and hit the ‘See First’ to be certain that I show up in your news feed!

I love it when something ordinary jumps out at me and I instantly see how it can be extraordinary.
Last month I came across something that stopped me in my tracks, (pun intended)… An old Railway Express Agency shipping crate. It was worn, dried out, beat up, and begging for some true old fashioned TLC.


Without hesitation I hauled it home, where it has been sitting in the corner of my living room, until last week when I finally decided to move it out into my workshop where I have a line up of projects ready to tackle. I figure if I added it into the line up, there would be a better chance that I would be inspired to work on it!
I immediately knew what this old crate needed and I got to work.
I started by scrubbing it down and using tack cloth all over to make sure there wasn’t any loose dust or particles before I went to the next step.
Next, I added two coats of clear Zinsser Shellac.


I was working in my work shop on a mid 80’s day, so the Shellac dried extremely fast. I was impressed at the dry time, and it didn’t leave any sticky feeling behind.
I added Shellac to the entire exterior, interior, and lid. Once the Shellac was dry, it was time to add on the caster wheels. I picked these wheels up a few years ago and have been waiting to find the right project to use them on. This was it!
Adding the shellac pulled out all of the historical characteristics, markings and words. I love the transformation that shellac does to wood! It is a beautiful process!
I remember during my childhood when my dad would ask me to assist him with projects and it would always make me feel so special to help him, even if it was just handing him nails, I felt so important. Now, when I work on projects, I try to find a task somewhere during, that my kids can help me with, hoping that when they grow up, they will not only have memories, but will have useful skills that they can use too!
I asked my son R to help me with the caster wheels. He is usually a little hesitant with projects, but with me showing him an example and putting the first screw in with the hand drill, he jumped right in and took over. He is 13 now, and I feel like time is flying by. I want to be the very best mom possible and teach him all that I know, while he is still here with me!


Adding caster wheels is not a complicated task! Don’t let it scare you! Caster wheels come in many different sizes and you can get ones that swivel 360 degrees, or ones that only roll backward and forward in a straight line. I always get the ones that do a complete swivel, this makes it so much easier when moving things around, especially if it’s something like a coffee table that gets pushed and pulled in all directions by everyone
After he added on the four caster wheels, it was time to add some pulls onto the lid, for easy opening. This is when my son ran way. Hah. I give thanks that he stayed with more for at least a small portion of my project!
The pulls were picked out by my 8 year old daughter. We were looking for something rustic that looked like it had always been a part of this old crate.
Since these pulls had a bit of a bump out on the bottom where it would meet the crate, I had to measure the size of that bump with the drill bit gauge. (Pictured above on the left). I used that size drill bit to go into the wood just as deep as the bottom of the pull needed to go in, then on the underside of the lid, I drilled in a hole that was one size smaller than the screw for a tight fit. I didn’t have any pull screws on hand that were the right size, so I made due by placing two washers in between the lid and each screw so it was nice and snug and secure.
One the pulls were installed, it was time to sit back and smile at another project well done and another piece of forgotten furniture brought back to life and rescued!

Today I decided to add some much needed TLC to our little milk house.
Rummaging around our scrap wood pile, looking for pieces of wood to making ‘something’ with, I got the idea to whip up some shutters for the front window of the milk house! I have never made shutters before, and I honestly didn’t really know what I was doing, but using my handy DIY gene, I think I did a pretty great job!
I measured , of course, twice right? I cut four boards the same length, these would serve as the main shutter, then I measured four more boards, which would serve as the cross pieces that will hold the shutters together and add the final character. 
After assembled, I went over the shutter twice with Minwax Polyurethane and stain in black, let dry and attached to the milk house using wood screws.

Here is the milk house before:

Also, kind of like the book, ‘If you give a mouse a cookie,’ my projects always spiral into other projects. After building and installing the shutters, I realized the window still needed a little something more. I then got the idea for a window box planter, and was planning to build one out of scrap wood or find something cool to re-purpose into a planter, when I came across an old white cornice that I had removed from above our living room window upon moving into our house.
Perfect! I flipped it upside down, and screwed it onto the milk-house, under the window! Lined it with plastic lining, drilled in some holes, filled with dirt, robbed flowers from other planters I had, and it was complete!


See for yourself below what a difference something as simple as scrap wood and flowers can make!


I hope this gives everyone a bit of inspiration to ‘see’ things differently!
Find this project over on Hometalk.
Find me on Facebook for more DIY inspiration!

Living in a 1920’s farmhouse requires more than just having a country soul, it means so much more than that. It requires a heart that is able to see potential, possibility and one that will pour love into every single part of the farmhouse, including the ugly not so glorious parts.
Now, fixing up a 1920’s farmhouse, on a budget, requires a different set of eyes. Eyes that are able to look at things a bit offbeat than the crowd does and possibly, a little more creatively with a frugal mind.
I may not have that immaculate dream farmhouse you see grace the cover of a diy magazine, but I have a home, that is filled with love and that we pour our heart and souls into.
We purchased our home 3 years ago and ever since have been working on small, frugal makeover projects. We were blessed with a home, that (in our eyes) didn’t need a full gut job in any room. Remember, the simplest, cheapest thing you can do to update your home or space,is to just add fresh paint! That’s a subject for another blog post though, hopefully coming soon!
The last week I have been plugging away on redoing our kitchen counter tops with a paint kit from Beyond Paint. Typically, one could get this done in a day, but between energy lows from Lyme Disease, dentist emergencies, and coaching my kids in online school, it took me 4 days. Also, being the spontaneous artist that I am, I don’t ‘plan’ my projects on free days, I start when I feel motivated and ready to go, even if that is in the midst of craziness, it’s just how I’m wired, and it works(for me).
Here is what our counter tops and our kitchen looked like, when we moved in, aka before I got my hands on this space. Two years ago, I ripped off the wall paper, painted the walls, and the cabinets and it made an amazing difference and really brightened up the space!


Beyond Paint’s counter top makeover kit comes with everything you need to transform your old, outdated counter tops, without making your family go without groceries for 6 months. Granted, this isn’t everyone’s cup of tea, and that is fine by me, but it follows along the lines of one of my favorite sayings, ‘do what you can, with what you have, where you are.’ Our budget doesn’t allow for brand new counter tops, because we all know, if you get new counter tops, you will need new cabinets, and if you get new cabinets, you might as well install that dream farmhouse sink you’ve always wanted, and if you are going through all of this trouble to replace all of that, you might as well open up the wall between the kitchen and the dining room, while you’re at it. DIY projects and home renovation projects kind of remind me of the children’s book, ‘If you give a mouse a cookie.’ I joke with my kids that one day I will publish one that relates to home projects. Stay tuned on that one.
To prep my counter tops for paint, I made sure to thoroughly was them with a kitchen scrubber and hot water with dish soap, then I dried them with a rag. I taped off my edges (If you are slow and careful, you can skip painters tape, I do it as ‘insurance’ , mostly because I’ve learned the hard way )
These are what our counter tops looked like before. They had endured many many years of hard use before we moved in. I was happy to extend their life for a little while longer with Beyond Paint. 


Horrible right? I wasn’t sure that paint could fix something this far gone. It would be a miracle if those deep scratches and stains were covered up.
After washing my counter tops, the transformation began! I simply, rolled on the base color (Bone) and gave it a good three coats. The paint went on extremely easily and had a nice thick texture. I was surprised how much much area was covered from just a little bit of paint. If you do two thorough coats, that is more than enough, I threw on an extra coat, just because I had enough to do so and it never hurts to have an added layer of protection.

The above photo was after the first two coats of ‘Bone’. I liked the clean look of it so much, that I was tempted to leave it a solid color. Beyond Paint offers a variety of color combos that you can do, which makes it fun and able to fit your style.
After applying the first tone of paint with a roller, I sprinkled on the ‘flakes’, first throwing them onto the vertical back areas of the counters, and then the flat surfaces. I over shook them onto the counters, which I recommend, because after wiping off with tack cloth and sanding down lightly with fine grit sand paper, many will fall off and not stay on. By over applying, it leaves more than enough behind for a nice look!


This is a step that you can end at as well if you prefer the look (of course after adding a top protective clear coat. However, I wanted to go all out and do one more step of color)
After applying the flakes, and lightly sanding them down with fine grit sandpaper, I wiped the counters down extremely well with tack cloth. Tack cloth is a sticky cloth that will pick up any of the loose flakes, dust, dog hair, dirt, and debris from sanding.

I then used a sea sponge to blob on Ash grey paint. I bought a few different sizes of sea sponges, and flipped them from the bottom to the side every now and then, so every smudge of paint didn’t have the same repetitive shape. After the grey had dried, I wanted to soften it up just a tad, so I took a new sea sponge, and dipped it back into the Bone color paint and lightly dabbed over each dark grey spot and it gave it just the look I had wanted!
Next it was time to make that ugly crack in the corner of our counters disappear. I bought white paintable caulk and filled it in as thick as I could. It may not hold forever, but for now it looks better.


After letting the counters cure over night, I rolled on 3 clear coats of clear sealer that was included in the paint kit.

Here are the counters a few days after the had dried! We love the look and are happy that we were able to extend their life a little while longer!


What is a makeover without a little touch of Joanna Gaines? I tore out the Magnolia Manifesto on the last page of their Spring journal and tucked it into a frame, made by ‘Once Abarn a Time’ . It looks beautiful and I absolutely love the words.

Interested in giving your sad counter tops a refreshed look like I did? Head on over to check out Beyond Paint and see what they can do for you and your home!
I am very please with the paint kit from Beyond Paint, and I would highly recommend it to anyone looking to rescue their old counter tops!
As always, you can follow along with more of my DIY projects and antiquing adventures over on Facebook.

Today I wanted to share with all of you a great line of paint, called ‘Beyond Paint’.
I was recently contacted by Beyond Paint to give their furniture makeover kit a try.
On their website, Beyond Paint says the following about their product:
“No Stripping, No Sanding, No Priming
BEYOND PAINT™ your cabinets, furniture and accessories in one convenient kit!
Refinish almost any surface with this combination bonder/primer/finisher that cures to a durable, washable surface in just one or two coats. Application is foolproof, and the result is a beautiful, professional finish that will transform your home.
The amazing BEYOND PAINT™ Cabinets Furniture & More Makeover Kit also includes the best tools for the job for your convenience and ease of application saving you money and hassle on your home projects.”
The furniture makeover kit came with everything that I needed to complete my furniture makeover project, it even included an instructional dvd!

The Beyond Paint Makeover Kit Includes:


For this project, I decided to update the TV dresser that is in our living room. My interior design style has matured a lot in the past couple of years, and I went from loving dark rustic colors only, to really embracing bright and light natural colors, with touches of wood tones. Last Fall I also painted our living room, for the second time. When we moved into the farmhouse 3 years ago, the walls were a dirty, smokey off-white, and I painted them a soft blue. After time I realized I didn’t like designing around blue walls, and now went with a super soft grey with blue undertones and it is so much easier to incorporate other colors into my space with that tone as a backdrop.
This is what our TV dresser looked like before I gave the makeover with Beyond Paint a go:

In the winter months, my furniture makeovers usually take place in my dining room (sorry family!). I am still working on getting my little workshop heated so I can tackle more projects even when the temperature drops below 40 degrees.
Since my dresser was previously painted, and Beyond Paint requires no stripping, sanding or priming, this was an extremely easy and quick project. All I needed to do to get started was wipe down the dresser with a wet rag, dry it off, make a big cup of coffee and I was on my way!
Here are the results of just two quick coats of the color ‘Nantucket’ by Beyond Paint!


This blue adds a nice pop of color to our living room, without being too overwhelming. When I walk into our space, my mind feels relaxed and refreshed and I am surrounded by colors that remind me of beautiful Lake Superior and colors found in nature.


I finally feel content with the gallery wall as well. If you have a gallery wall somewhere in your home, you will understand when I say that it is an ever changing and evolving project.
I absolutely loved the final result and the ease of use of Beyond Paint. The paint goes on nice and thick and has amazing coverage! I look forward to using Beyond Paint products again the future, and am hoping to give their counter top paint a try this Summer!

Have you ever head of the saying, ‘Do what you can, with what you have, where you are?’ That quote applies to many different areas of my life. Particularly to how I decorate my home, and how I create.
I live 15 miles out of the city, on an old hobby farm, so trips to town do not happen every day, and I usually find myself digging around our sheds and my workshop when I am trying to build or create something, and try to make do with whatever I can find. Sometimes I don’t even know what I’m creating until I’m 50% done with a project!
This little table was a thrift store find several months ago, and I finally got around to giving it a bit of a makeover recently.
 Table Before
I sanded down the top of the table, and lightly sanded down the legs. Then I gave the legs & table edges a fresh new coat of Rustoleum hammered metallic spray paint in a bronze tone.
I topped off the table and the sides of the table with old yardsticks that I cut down to size using my chop saw. After applying the yardsticks to the table top and sides with small tack nails I rescued from my Grandfathers garage, I finished off the table top with a nice coat of Minwax Polyshades (stain + poly top coat)
Table After:


Another fun project, and another piece of thrift store furniture rescued!
Visit me on Facebook for more DIY projects, ideas and inspiration.

If you are an artist in any form, (painter, architect, contractor, wood-worker, writer, photographer, etc) than you understand how important continually finding inspiration is. Sometimes as artists, we can get inspired by something we see on tv, a magazine, a walk in nature, or attending an event like the Minneapolis Home and Garden Show!
This past Saturday, I attended The Minneapolis Home and Garden show.
My husband dropped the kids and I off at The Minneapolis Convention Center around 9:45 am, we flew in the doors in a rush to hear Matt Muenster speak at 10:00! We made it to the area he was at, 5 minutes prior to show time! If you have never been to the Convention Center, it is a very big space, especially when you don’t know exactly where you are going.
Matt is an interior designer, licensed contractor and tv personality on HGTV’s Bath Crashers. He is also partnered with Decolav and has teamed up with them to create an exclusive collection of stylish bathroom products.
Matt walked out onto the stage dressed sharp with a big heart warming smile on his face.
He gave a wonderful talk and I truly felt so inspired while listening to him. He shared some insider information about Bath Crashers, how they pick the Bath Crasher winners, “You need to be the coolest of everyone we talk to!” He said. I liked that. His honesty, his humbleness and knowledge poured out of him during his talk. He also shared some tips about crashing your own bathroom, and mentioned to focus on one statement piece, as in a custom mural wall. One thing that really stuck with me that I will take with me while working on our own bathroom, is to not waste your bathroom space, “It is valuable square footage,” Matt said, “Don’t waste it just to go in and out of to take care of business, make it a place to relax. If you like coffee, put in an espresso maker. (He is speaking my language there!) “Don’t worry about what the neighbors think, what the next possible home owner may think, incorporate what you love into your space!” I wish I would have videoed his entire talk!
We were blessed with the opportunity to meet Matt and get his signature and a photo. My 7 year old daughter made Matt a birthday card which included a Bathroom Mood Board on the inside with bathroom design pieces from my magazines, like a bath tub, lighting, sink, wall hangings, flooring, paint color etc.


After the excitement of meeting Matt, we headed into the Auditorium to see The Property Brothers! We got into the auditorium over 40 minutes prior to their talk, and it was already over half way full. They drew a crowd of thousands! When they walked out onto stage, just like when Matt did, the kids looked at me, and I at them, and we all were embracing the fact that these incredible men that we see just about daily in our living room, on television- are real! Just like us! Camryn kept saying, “Mommy this is so weird!”
Drew and Jonathan Scott, of the Property Brothers gave out some great advice about real estate investing, paying off your mortgage, and of course they tied in some humorous skits and videos as well. They are quite the funny duo!


After The Property Brothers finished their talk, and we rushed back to see them again on the smaller stage. We enjoyed a few delicious popcorn samples near by, when we heard Matt Muenster call out Camryns name! She smiled so big! He thanked her again for the birthday card, and we took the opportunity for another photo with him. This guy is a class act! As we walked away, Rayce said, “I can’t believe he remembered Camryns name!” Then Camryn said,”I think it’s because I was wearing a blue jacket.” Camryn has been carrying around her signature from Matt everywhere, since we got home on Saturday night and she asked that it be hung above her creative art area, so she can see it while she is working her art projects.


Once our excitement decreased from getting to talk with Matt again, we wandered around the Home Show and enjoyed some lunch. We only got through about 1/3 of the booths in the limited time that we had. Next year we will be sure to allow more time to enjoy at the show.


After lunch, we headed to the long line to wait to go look at the Tiny Home Village! My 12 year old son was begging me to go see these. I am so glad we did! I loved the simplistic design and really loved the way that they were staged inside. The details are important1 I see myself having a Tiny Home someday, tucked alongside a big mountain, for a second vacation home. I’m a big dreamer, with dreams of a little house in the mountains.


What a fun day! I left the home show, feeling so inspired, after meeting Matt, hearing him and The Property Brothers talk, and seeing all kinds of project ideas I could incorporate into my own home. I would highly recommend the Minneapolis Home & Garden show to anyone who is looking for ideas, inspiration, or quality craftsmen and women who can help them bring their ideas for their home, to life.
I am already looking forward to our adventures at the home show next year! Maybe I will see you there too?!
Remember you can follow along with my DIY adventures over on Facebook too!

Two weeks ago I came across a great little ottoman at Hope Gospel Mission Bargain Center in Eau Claire, Wi for $3.00! After my employee discount the total came to around $2.80! What a deal! (p.s. a tip for shopping there, if you are 50+, on Tuesdays you can save 20% off your entire purchase ! )
I just loved the style of this ottoman and knew it was a piece of furniture that I could breathe new life into. Below is what the ottoman looked like as I found it at the Bargain Center, and what was underneath that dirty green fabric!


I let it sit in my living room for a few days, where I could see it, and try to figure out a plan for it. I kept going back and forth between giving it a light beach cottage feel, or a Western rustic style.
As I looked around my home to see what I had for material to cover the top of it, I came across an old potato sack that I found last year at Oronoco Gold Rush Days, where I went on a hunt for anything that had a Western design or feel to it.
The potato sack was dirty and had stains all over it, that discouraged me a bit, but then I discovered that I could simply just wash the stains out!
Below are photos of the potato sack getting a bath. I simply filled the bath tub with warm water and a bit of laundry detergent and gave it a good 10 minute soak, then scrubbed gently with a scrub brush in the areas that it had dirt stains, wrung it out, then hung it out on the clothesline to dry over night!


Once the potato sack was fully dry, I cut it open along the seams on the side and bottom, laid it out on the floor, image side down, set the ottoman upside down on top it it and cut a circle about 4+ inches bigger than the ottoman, so I would have enough material to go over the sides, and underneath the ottoman where I then secured it with staples, using a Staple Gun. After the potato sack was secured, I then painted the legs red and topped them off with Minwax Polyshades stain + poly, and it was finished!


This was a really fun and easy project and the great part is that if I decide I want a different style, it is simple to removed the potato sack and recover the ottoman! But for now, it looks right at home in our old farmhouse.
I hope this blog post has inspired you to see beyond what something IS and to see what it’s potential can be!
Have a beautiful Sunday, get outside and enjoy the sunshine!
Remember, you can follow along with my DIY adventures over on Facebook as well!

Potential is a beautiful thing. To see something and know that it can be more than what it currently is takes a special kind of vision. All things, all people hold an unlimited amount of potential. Sometimes, all it takes to let go of what one is, and become what they might be, is for one person to say, “I believe in you.”
As I was in search of a chair for my sons industrial style bedroom, I came across this lonely little chair at Hope Gospel Mission Bargain Center in Eau Claire, Wisconsin. I knew right then and there, that it was full of amazing potential. I could already see it in my mind, proudly sitting in a dark stain, next to my sons desk.

Do you hear it’s cries for help? All it needed was for some kind soul to come along, and see the potential that it held. For this lucky chair, that someone, was me.
I started working on the desk chair right away, I even had a nice little volunteer help me start sanding down the seat.

After sanding the entire chair, both with an orbital sander, and then with a folded up piece of sandpaper by hand in the hard to reach areas, I dusted off the chair with tack cloth.
Once the chair was wiped completely clean of any dust or debris, I then started to stain it, using the color by Minwax, ‘English Chestnut’ , one of my favorite stain colors, it has such a rich, deep tone, but not too dark. Once I completed 2 coats of stain and allowed for dry time, I then hand wiped on Minwax Wipe-On Polyurethane in high gloss.
The once sad, neglected office chair, suddenly came back to life. As the chair finally became what it always had potential to become, it also gained a name. Yes, a name. My 7 year old daughter was convinced it deserved a name, I definitely agree with her.
So, my friends, you’ve waited long enough. I would like to officially introduce you to the newest member of our little farm house;
Stanley.
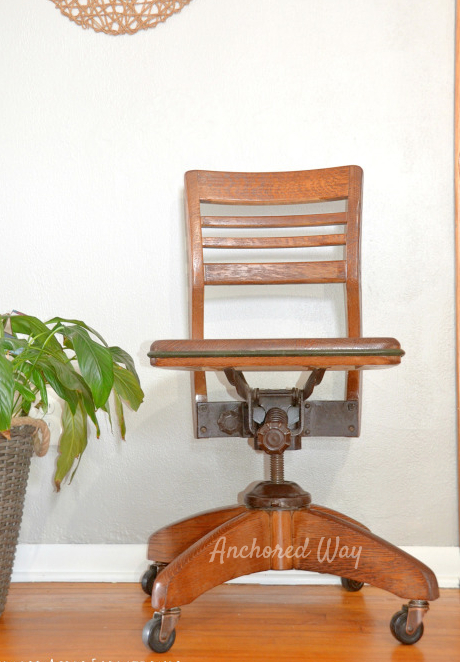

Isn’t Stanley handsome? He sure catches my eye! Here he is, in his new location in our home, sitting proudly in our sons bedroom;

I hope by seeing the way that Stanley here came alive and how I believed in the potential he had, inspires and encourages you to open your eyes, see the beauty that is possible in all things, and that you can feel empowered to take on your own DIY projects!
I hope you all have a beautiful Sunday evening! Be sure to follow Anchored Way on Facebook if you want to see more DIY ideas, along with weekly inspiration!

If you are a regular follower of Anchored Way Trading Co, you by now know that I am a lover of travel, adventure, wandering back roads and the outdoors. I find myself often day-dreaming of driving the car, down an old back road in the mountains of Montana, windows down, radio on, the wind blowing through my hair… (okay let’s be realistic, … * the wind blowing my hair into my face…) , and nowhere to go, ..but everywhere.
I’m a dreamer. A day dreamer, yes. A night dreamer, of course, but most importantly, I believe in the dreams that God has instilled into this heart of mine. Progress, no matter how slow, is progress. A step forward, is still a step, no matter if it’s a running step or a walking step. Little by little, we get closer to becoming who God created us to be.
With each piece of furniture I create, I feel more like me & I feel my wings opening further. This, an artist, is who I am. I am here, to create and inspire you.
I came across this lonely desk while I was working at Hope Gospel Mission Bargain Center in Eau Claire, Wisconsin and knew it needed to come home with me to my workshop. I knew, it had potential, I could see it.

I was originally planning on giving the desk a new life and selling it at my favorite little local coffee shop, The Living Room Coffee House in Eau Claire, but once finished and placed in a corner of my living room, it was like the desk looked at me and said ‘Let me stay right here,’ and there, it still sits. Now it has a new life, a new home and is once again loved and provides my kids and my family with a little school / home work station and organization for all of the papers they bring home from school every day.


There it is friends! Completely perfect for our family! I used an old Montana map, that shows two of the towns where my kids first saw the mountains a few years ago on a road trip. I was blessed to have been given my late Grandfathers chair that he used in his basement workshop at his desk, every time I look at it, my heart smiles, and every time I sit in it, like I am now, writing this blog post, I know my Grandfather would be proud of the work I do.
If you are interested in a custom furniture piece, like this for your home, or place of business, feel free to contact me with any questions; endlessacres@live.com
You can also follow Anchored Way Trading Co. on Facebook.
Have a blessed day- get out there and unleash your inner artist! Dream, Create, Believe in yourself!

Products used in this transformation;